How To Configure Setup In DVNASMS ?
|
|
Whenever our customers start using this software first time, then they have to
configure some pre requisite data entry which is known as setup configuration of
DVNA School Management System Software. These pre requisite data entries are
vary from school to school because each school has their own process or thought
and add on features. Step by Step Setup configuration in DVNASMS is as given
below.
|
Step1. Class Name Entry Configuration
|
|
Go to your URL like http://dvnasoftech.in/dvnasms/
and click on it then it will open employee login panel, authenticate your
employee login by putting user name and password. Before start this
configuration you should confirm about your application role. Your user login
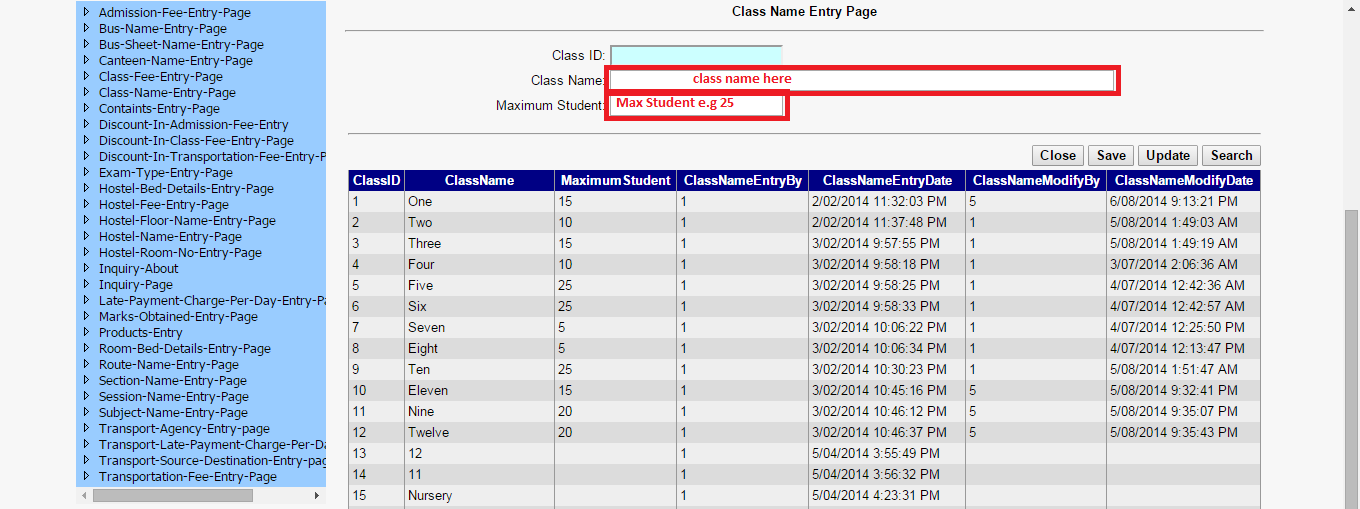
must have administrator role in DVNASMS. Click on Class-Name-Entry-page and
as given below is the class name entry page. It is required two parameters,
class name and maximum students. You can put her class name and maximum students
in the class according to your school’s requirement. It depends upon you which
are independent of application fixed parameters.
|
|
Step2. Discount in Class Fee Entry Configuration
|
|
Authenticate your User Name and password on employee login panel. It will open
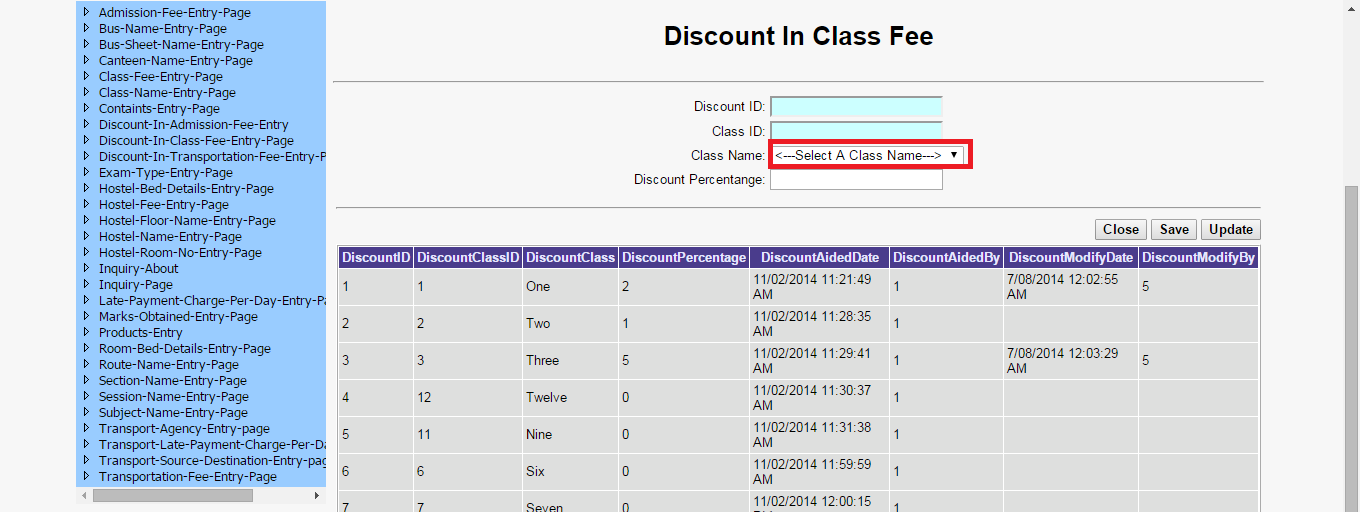
contains page. Go to discount in class fee entry page and click on it. It will
open discount in class fee entry page. Select a class name from class name drop
down list. Whenever class name will be selected then it will be auto filled
class ID. Put discount in percentage according to your school’s requirement or
policy. It is fully dependent upon you. Here you have to configure only one
parameter which is called % discount in class fee. Click on save button and
confirm it inside grid view which is shown in below.
|
|
Step3. Discount in Admission Fee Entry Configuration
|
|
Authenticate your User Name and password on employee login panel. It will open
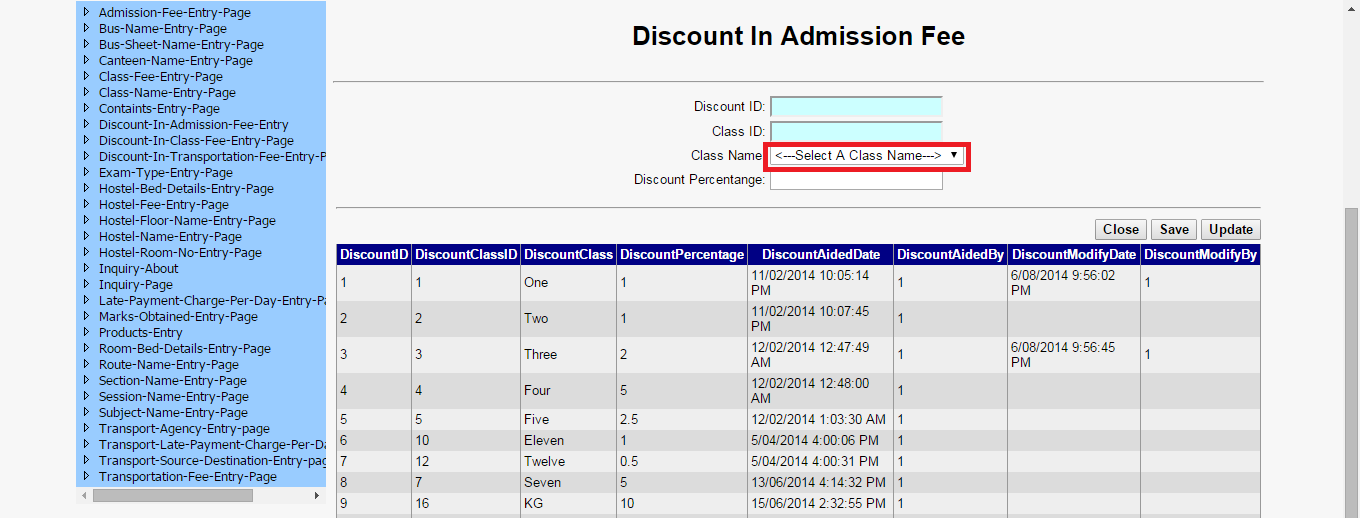
contains page. Go to discount in Admission fee entry page and click on it. It
will open discount in admission fee entry page. Select a class name from class
name drop down list. Whenever class name will be selected then it will be auto
filled class ID. Put discount in percentage according to your school’s
requirement or policy. It is fully dependent upon you. Here you have to
configure only one parameter which is called % discount in admission fee. Click
on save button and confirm it inside grid view which is shown in below.
|
|
|
Step4. Class Fee Entry Configuration
|
|
Authenticate your User Name and password on employee login panel. It will open
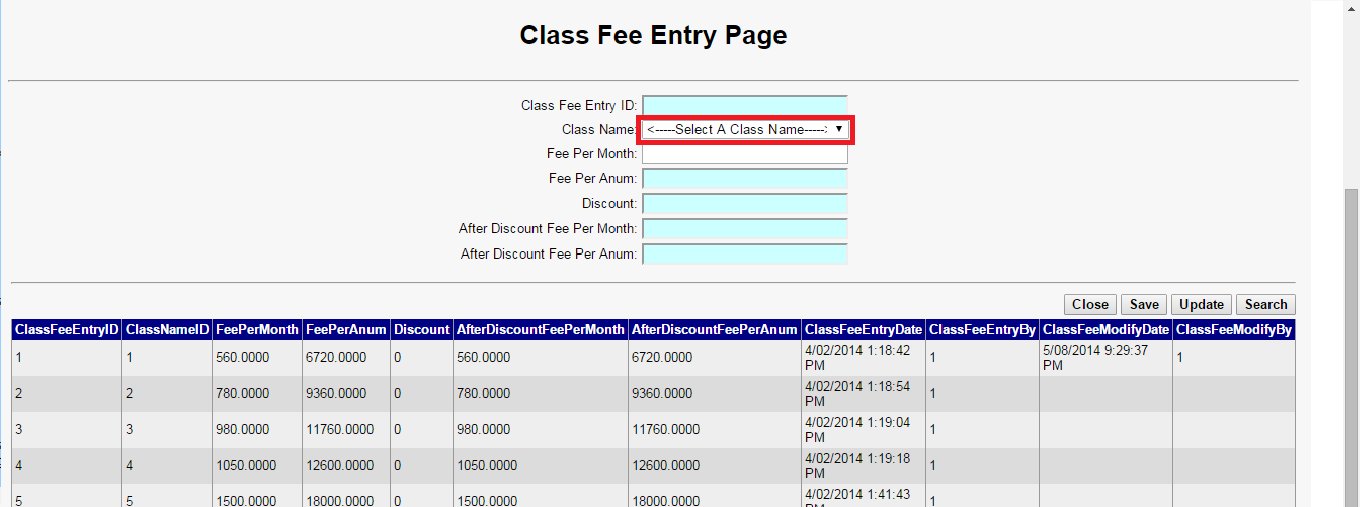
contains page. Go to class fee entry page and click on it. It will open class
fee entry page. Select a class name from class name drop down list. Whenever
class name will be selected then it will be auto filled percentage discount in
class fee. Put class fee per month according to your school’s requirement or
policy. It is fully dependent upon you. Whenever class fee will be entered into
class fee text box then it will auto calculate after discount class fee per
month and after discount class fee per year and it will be shown as given below.
Here you have to configure only two parameters which is called class name and
class fee per month. Click on save button and confirm it inside grid view which
is shown in below.
|
|
Step5. Inquiry about Configuration
|
|
Authenticate your User Name and password on employee login panel. It will open
contains page. Go to inquiry about entry page and click on it. It will open
Inquiry about page. Put inquiry about name as Interview in inquiry about text
box field. Again put admission in inquiry about text box field. You have to
configure only one parameter which is called inquiry about configuration. Click
on save button and confirm it inside grid view which is shown in below.
|

|
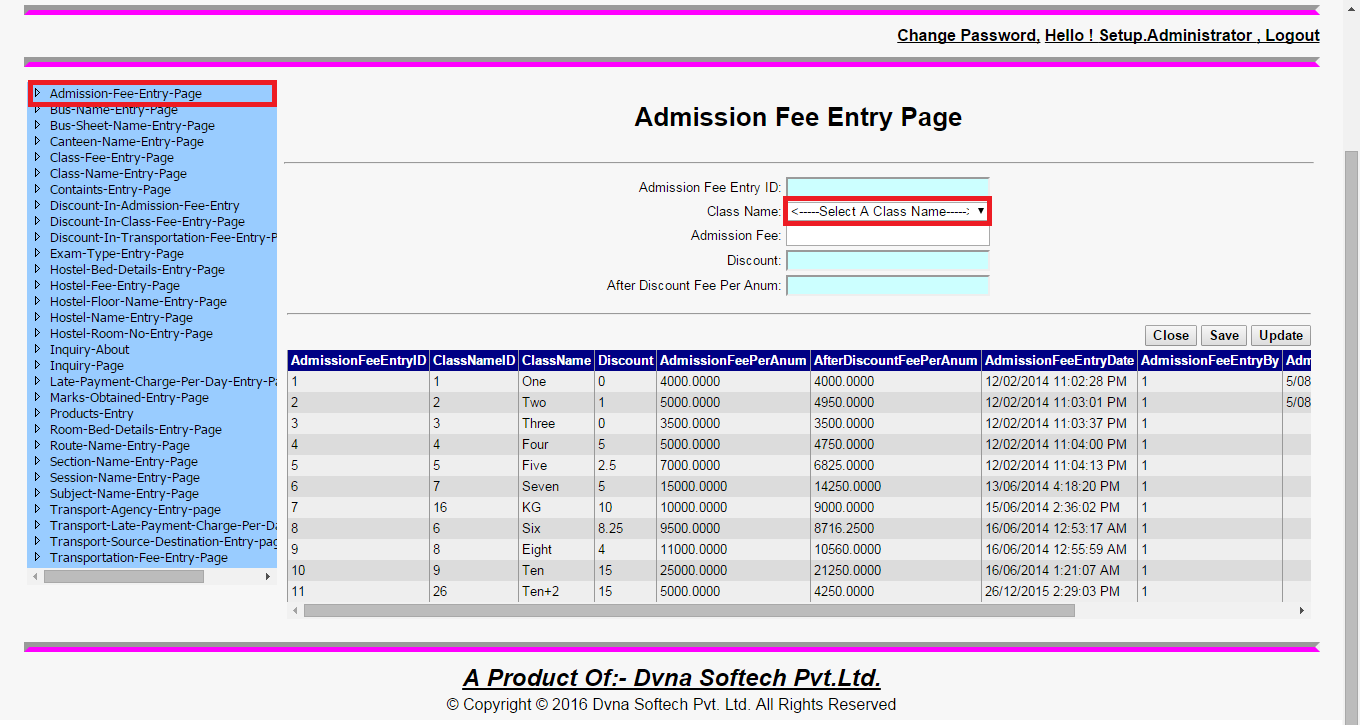
Step6. Admission Fee Entry Configuration
|
|
Authenticate your User Name and password on employee login panel. It will open
contains page. Go to Admission Fee Entry page and click on it then it will
open Admission fee entry page. Select a class name from class name drop down
list. Whenever class name will be selected then it will be auto filled
percentage discount in admission fee. Put admission fee per month according to
your school’s requirement or policy. It is fully dependent upon you. Whenever
admission fee will be entered into admission fee text box then it will auto
calculate after discount admission fee per year and it will be shown in
admission text box fields. Here you have to configure only two parameters which
is called class name and admission fee per month. Click on save button and
confirm it inside grid view which is shown in below.
|
|
Step7. Products Entry Configuration
|
|
Authenticate your User Name and password on employee login panel. It will open
contains page. Go to products entry page and click on it. It will open products
entry page. Put product name as Interview in product name text box field. You
have to configure only one parameter which is called product name configuration.
Click on save button and confirm it inside grid view which is shown in below.
|

|
Step8. Section Name Entry Configuration
|
|
Authenticate your User Name and password on employee login panel. It will open
contains page. Go to section name entry page and click on it. It will open
section name entry page. Put section name as ‘Sec A’ in section name text box
field. Click on save button. You have to configure only one parameter which is
called section name configuration. Here section name is depends in your school’s
section name. Whatever school section name will exist you can put it, save it
and confirm it inside grid view which is shown in below.
|

|
Step9. Subject Name Entry Configuration
|
|
Authenticate your User Name and password on employee login panel.
It will open contains page. Go to subject name entry page and click on it.
It will open subject name entry page. Put subject name in subject name text box field.
Click on save button. Here you have to configure only one parameter which is called subject name configuration.
Subject name is depends in your school’s subjects. Whatever school subject name will exist you can put it,
save it and confirm it inside grid view which is shown in below.
|
|

|
|
|
|
|
|
|
|
|
|
|
|
|
|
|
|
|